DIY – Nostalgia, my very first application

Two years ago I sewed a table runner (my first) as a present. It was then that I made applications for the first time and noticed how much fun it was for me.

Today I just wanted to show what I had done this year with the rest of the fabric from the table runner. And yes, it went to the same person as the table runner hihi

I noticed that I hadn’t posted the table runner at all, like many things I had sewn myself.

OK, here it is. I found the idea of sewing birds with fabric printed with birds funny.

DIY new lining for baskets 00

Here’s a pair of birds. I had found something similar on the internet and used it for my own good.
The black seam, which is not very even, I made extra like this. I thought it looked better that way.

The only things I don’t like anymore are the eyes and the beak. Today I would no longer sew them with the machine, but with my hand.

DIY table runner 02

It was not only my first application, but also the first time that I sewed such a corner. Thanks to Youtube 😀

DIY table runner 03

And now for the table runner. There are some things I sewed that I don’t like anymore, but I still like the table runner ❤

DIY table runner 01

But now to the part I wanted to post today.

I still had some fabric in my closet and was thinking about what I could do with it. It should go to the same person as the table runner, so it wouldn’t be bad if I found something that fits.

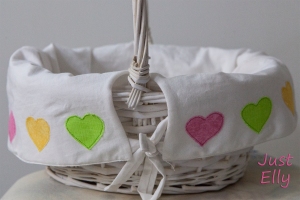
It was the time before Easter where you can buy Easter decorations in all shops. There I saw a basket in white and I got the right idea what I could sew.

DIY new lining for baskets 01

DIY new lining for baskets 02

The basket is big enough that you can put flowers in it in spring or a rabbit at Easter 🙂

Maybe I should learn how to sew stuffed animals? Hihi

DIY Shopping bag – Vintage fabric

Who doesn’t know this after shopping? Paper bags are too weak for heavy shopping and plastic bags are harmful to nature.
So you sew a shopping bag as a gift 🙂
I made the bag with two handles. You can carry it over your shoulder and with the short handles in your hand. Just how you like it.

You can’t see it in the pictures, but to prevent the bag from sagging when you have heavy shopping in it, I sewed extra protection into the bottom of the bag.

One side with long handles

DIY Shopping bag 02

Side with short handle

DIY Shopping bag 03

Backside, even if you can carry the bag as you like

DIY Shopping bag 04

I sewed another little bag inside. For mobile phone or also purse

DIY Shopping bag 01

I just hope she likes the bag. I know that she, unlike me, likes vintage style 🙂

Ikea Grundtal as a form dress pin cushion

Three months ago, the teacher left the sewing class. She took a job in another store. Unfortunately!

I wanted to do something very special for her as a thank you and to show her what I learned with her.

I’ve been thinking for a long time about what I could do for her.

Then I saw a Christmas cover for a wine bottle on the internet and wanted to sew something like that for her.

Unfortunately, I didn’t know if she was drinking wine at all. I never drink wine myself and if someone gave me a cover like that, I would never use it!

On my next visit to Ikea I saw the Grundtal container with the magnet on the bottom and I knew what I wanted to do:)

A FORM DRESS PINCUSHION !!!

Ikea Grundtal pin cushion 01

Ikea Grundtal

Ikea Grundtal pin cushion 44

This pincushion is the second one I’ve made. The first one had to be finished so quickly that I didn’t have time to take photos for the tutorial.

That’s how I did it.

These things I needed:

1 Ikea Grundtal container

2 different fabrics

ribbon

1 round wooden pole 3/8″

1/8″ plywood

wood plate

foam padding  1 3/4″

glue

beads 1/8″

Ikea Grundtal pin cushion 02

a collection of what I used


I used my form dress as model to make my pattern

Ikea Grundtal pin cushion 03


My pattern has 10 inches. (I’ll explain the red marking later)
Front and back are identical. Only the darts are different. I have added half an inch

Ikea Grundtal pin cushion 07

I started with my container.

A colleague sawed out the round piece of wood for the container and the oval plywood. Thanks again for this:)

The oval plywood should have the width of the container. It’s supposed to stabilize the doll.

Ikea Grundtal pin cushion 04

The round piece of wood is used to put the wooden stick in later. At the same time, the container should become heavier so that the doll does not fall over later.

I didn’t have any wooden panels of the right thickness for the container.

That’s why I took 2 wooden plates, which together had exactly the right thickness. (1/8 ” below the edge of the container)

My colleague used a hole saw to saw the 2 wooden plates. This was very helpful for me, because I had a marking exactly in the middle of the wood because of the drill in the middle of the hole saw.

To drill a 3/8″ hole through the container cover and the wooden plates, I put the cover between the two wooden plates. In this way, the plastic cover cannot break.

Then put the wooden plates in the container, put the cover on and insert the wooden stick through all 3 holes. Make sure that the wooden stick is really straight! If not, the dress doll will be crooked later on.


If you used two wooden plates like me, glue them together. Make sure that the drilled holes are exactly on top of each other.

Paint the wooden stick in the color you like.

Now glue and paint have to dry first. In this time you can start sewing.

Cut out front and back parts. Sew the darts in both parts.

Ikea Grundtal pin cushion 09

Close both sides together

Ikea Grundtal pin cushion 10

For the next step you need the oval plywood and a piece of vilene. Draw the outline and add 1/2″

Ikea Grundtal pin cushion 08

Cut out the vilene and iron it on your fabric. Add 1/2″ to your fabric, too.

Ikea Grundtal pin cushion 11

Now, you need to sew this piece of fabric on the bottom.

Ikea Grundtal pin cushion 12

Glue the plywood on the vilene

Ikea Grundtal pin cushion 13

Because the glue has to dry now we continue with the container

Cut a piece of fabric for the container. The fabric must be large enough to be placed around the sides of the wooden plates. Glue the fabric to the top of the plate.

When the glue has dried, cut the hole in the fabric from the wooden plate. The more precisely you cut, the more accurately you can fix it later in the center of the container.

Put glue in the container on the bottom and sides. Additionally on the sides of the fabric.

Now place the wooden plate exactly in the middle of the container. With a small screwdriver you can stuff the fabric in the sides.

Ikea Grundtal pin cushion 15

Before you clamp the wooden plate, be sure that the hole is exactly in the middle. Do not exert too much pressure during clamping, otherwise the container will be damaged.

Let the glue dry for a few hours

I also glued the lid on the container.

Ikea Grundtal pin cushion 21

Back to the “dress”

Cut out the hole in the fabric from the bottom of the plywood.

Take your foam and cut it out in the width of the dress.

Ikea Grundtal pin cushion 18

Put the foam into the dress and cut the length. Be sure the foam is in the bottom of the dress. Leave the foam one or two inches longer than the dress.

Ikea Grundtal pin cushion 19

Now draw the hole from the bottom onto the foam.

Ikea Grundtal pin cushion 20

Take out the foam and write on which side the front or back of the foam was.

Ikea Grundtal pin cushion 25

 Take a big screwdriver and push it carefully and slowly through the foam. Start at the marked hole. Stay in the middle!

When you look at my doll, you realize that I didn’t stay in the middle: (

Ikea Grundtal pin cushion 26

Use the screwdriver to move back and forth several times and remove the foam parts. Try to make sure that you get through the foam with the round wooden stick. If not, use the screwdriver again. Then it should be easy.

Ikea Grundtal pin cushion 27

Now put the wooden stick with the foam into the container. Attach your dress to the foam and cut the foam in the length of the dress.

Ikea Grundtal pin cushion 17

Now you have to decide where to put the dress on the wooden pole. I left enough space between the dress and the container so that I can reach there with my hand. Put a marker on the wooden pole at the top of the dress. Saw the wooden stick 1/2″ below this mark.

Ikea Grundtal pin cushion 28

Glue the wooden pole into your container and let it dry.

Cut ALL corners of the foam to give it an oval shape.

Start with the buttock.

Cut a 4″ half round piece of the foam

Ikea Grundtal pin cushion 22

Round off this piece as shown in the pictures. Don’t cut everything at once. After each cut, put this piece into the dress and check if the result is acceptable. Small steps are important.

Ikea Grundtal pin cushion 23

Ikea Grundtal pin cushion 24

In the end it will look like this

Ikea Grundtal pin cushion 29

The procedure with the chest is the same. Here too, a 4″ foam piece is needed. Don’t forget: little steps and check every cut with the dress.

Ikea Grundtal pin cushion 30

Ikea Grundtal pin cushion 31

Ikea Grundtal pin cushion 32

Now cut the shoulder and neck from the foam.

Ikea Grundtal pin cushion 35

Ikea Grundtal pin cushion 36

The next picture shows why I had the red mark on the pattern. The dress just doesn’t look so good!

Ikea Grundtal pin cushion 34

Before the next step, remove the buttocks and chest from the dress and put the wooden stick through the dressed doll.

If you don’t do that, you have trouble finding the hole in the foam for the wooden stick.

Now put your buttocks back in the doll and then the chest.

In order to “fix” my dress, I didn’t cut the fabric off but stuck it with needles and sewn it by hand.

Ikea Grundtal pin cushion 37

Fill the sides of the chest with small pieces of foamed material.

Ikea Grundtal pin cushion 38

Close the shoulders and neck also by hand.

I added a little decoration to my form dress

The ribbon is glued to the container lid

Ikea Grundtal pin cushion 39

The necklace is made of very small beads and very thin metal wire.

Ikea Grundtal pin cushion 40

Ikea Grundtal pin cushion 42

And now my form dress pin cushion 🙂

Ikea Grundtal pin cushion 41

Ikea Grundtal pin cushion 43

Ikea Grundtal pin cushion 44

I hope you like my tutorial 🙂
My new sewn dresses with matching chucks

Didnt knew it has been this long since my last post. I have been very busy.

I’m still going every saturday to my sewing course and I still love it sooooo much

Here a few photos of my last projects. I made the photos with matching chucks because I have a lot of them and I really like to wear them ❤ ❤ ❤

I dont know exactly how many chucks I have – over 30 for sure. My most important colors  I have in high and low hihi

My last project is a jacket I made last weekend. It looks soooo cool. The jersey inside is nautical as are the colors. My chucks too hehehe

But see for yourself

  4a                                 4b                       5c4

I made dresses for me too. ME with dresses !!!! Usually I wear jeans, shorts, but never dresses. But I found a pattern I really liked. Can you believe I searched over 2 months for the fabric? At the beginning I didnt knew what fabric I wanted, but whatever fabric I have seen I didnt liked for my dress.

But 2 months ago I went to a fabric market and at the end of the day I found it !!!! And I knew THIS fabric would be the first dress for me since ages LOL

5                 5a

Isnt this fabric cute ???? The buttons has been Brigid’s idea. Old fashion style hehehe

I liked my first dress this much that I made the next one with the same pattern.

I bought a bodice few months ago at ebay. I planned to wear it this summer. But it has been a little to short.

But when my first dress has been done, I have seen that my bodice has been only a few inches longer then the upper part of my dress. I decided to use it for my next dress.

I shorten the bodice, changed the buttons and put the skirt on it. Take a look how perfect my seam looks like ❤ The ribbon is only decoration. But I liked how it looked like with this dress.

 1a

                                                                                     1d

As you can see the fabric ist nautical – again hehehe. See the cute buttons on the bodice? Found them on the internet.

Both dresses are the same pattern but because of the bodice I had to change the skirt.  This dress the skirt gets closed with buttons.

Over the last months I made a lot of shirts. But this two shirts are my favorites.

This fabric is a special one: one side is red with white stripes, the other side is blue with white stripes. The fabric is thin enough to wear it from spring to fall. I made one shirt with each color.

3a                3                 2a                 2

My next post will be with photos from my vacation. I have been on a beach and made over 2000 photos. I have to sort them all and choose what to post 🙂

See my sewing course results :)

In most of my posts I write about going every saturday to my sewing course.

But I only showed in the beginning what I have sewn. The apron and the loop I made at home.

Today I will show you WHAT I made in my course.

My first sewing course day has been september 28th. Now we are end of march and I finished this saturday the 3rd piece for myself. All other things I made so far has been for friends and family. Can you believe it?

Unfortunality I didnt made photos from all the things I’ve done. I asked my god child to get photos of the middle age cape I made for her. She needed this cape for her final examination. We didnt wanted to buy a ready-made cape because they didnt looked so good. So I bought dark green woolen, and sew it in my course.

Here are 2 photos:

Cape 1 Cape 2

The cape isnt to long. It was made for her model which is 1 or 2 inches larger then Sonja. Unfortunality you cant see the beautyful dark green here. It seems dark grey. I even bought a brooch to make it more middle age authentic.

Here are 2 jackets I made for myself 🙂

They are not perfekt, but I started both in october. Today I’m better with the seams hehe

The red jacket has been planned for the Advent season lol. The flannel inside is with Rudolph.

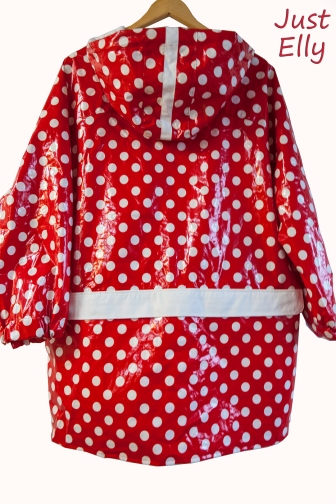
The grey jacket is with my much-loved dots and my fav color. I’m sure this jacket will get one of my favorite 🙂

Sweat 1

Sweat 2

Sweat 3

New fabric for spring and Easter – couldnt stop buying it

The new fabric collection for spring and Easter is out.

I couldnt resist. The new fabrics are too cute 🙂

This fabrics are for decoration at home. I will make baskets, tableclothes and stuffed animals.

I know I bought to much, but hey, I can make gifts for family and friends 🙂

Fabric 1 Fabric 2

I also got new nautical fabric

Fabric 3

do you see the one with the stripes? One side is blue, the other side is red. This fabric is a little thicker. I;m not sure will I sew 2 shorts or one 5 pocket jeans?

The 2 fabrics on the left will get blouses, the dark blue is jersey and will get a nice tee

The nautical fabrics are from my fabric store where I’m learning to sew. Every saturday I tell myself not to buy a new fabric. But when I see the new ones I had to have them hehe

My first apron

I bought  patterns from Burda Style 2 weeks ago. I wanted to make special curtains I have seen on the picture from this pattern. Besides my curtain there has been a pattern for an apron.

No, I dont wear aprons and I dont own one.But my best friend does 🙂

We will meet today. I have to give her the christmas gift (a bought one) . Why dont give a special self made gift too?

I startet yesterday evening and worked till 4 am. Yes, I’m not the fastest sewer so far, but hey, I’m still a beginner. I checked my fabrics, and chose 2 different cottons, same pattern but different colors.

Here is my apron:

_MG_9803

_MG_9806

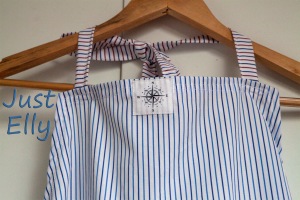
I’m damn proud of it. I love the colors and the compass logo makes it more special hihi

I made my first Loop

OMG OMG I did it.

My first sewing project all by myself !!!!

As I postet before we had the first snow 🙂 I took my camera and made photos. When doing this the snow were falling on my neck because. I forgot my scarf at home. Not so bad because of this I had an idea. Why dont sew a loop?

I wanted a loop which would be warm and with my favorite color and motive. In one of my first posts I wrote about my fav color = red and that I love polka dots and stripes.

For the loop I took flannel with polka dots and cotton with stripes. Both in red 🙂

MG_9704

And this is how my loop looks like

_MG_9726

I needed a little longer for it because I made a mistake and couldnt turn it inside out. I had to cut both seams and sew it again. This time it worked

And I so LOVE it !!!!

How to make a travel pillow

This one I have done long time ago but I couldnt post it because it has been a gift for my godchild Sonja.

She loves to travel a lot with bus, car, train. She never travels without her own pillow.

When traveling she runs with her suitcase in one hand, her bag in her other hand and her pillow under her arm. When I saw this for the first time I thought about how to make it easier for her.

We bought a new pillow for her. Did she choose a small one? NOPE, it has to be a big one LOL

 Case 1

And this is how I made it for her:

Material:

1 Pillow

2 different fabrics ( pillow 1 yard flannel, bag 1 yard cord fabric)

1 Zipper

3 x Clip buckles

2 different ribbons (pillow 40 inches, bag 2x 40 inches)

1 cord 40 inches

2 cord stops

I have chosen a nice flannel with cameras for the pillow.Sonja is an amazing photographer and what better motive I could have bought for her?

First cut the fabric for the pillow,sew the zipper on one of the larger side. (dont buy a zipper about the whole lenghts of the pillow because of the ribbons with the clip buckles.

Then cut the 40 inch ribbon in half.and put the clip buckle on one of it.

Case 7

Lay this ribbon in half like on the picture above and pin it with a needle 4-5 inches from the end of this side. When sewing this side, sew 3-4 time forward and back over the ribbon.

Close both shorter sides of the pillow. ( Open your zipper after this a little. Had a real fight to turn my pillow because I couldnt opened the zipper LOL )

On the last side put the second ribbon (dont fold it this time !!! ) in the the same distance as you did with the first ribbon and close this side.

Case 8

On the picture above you see the pillow with the ribbons, one folded, the other not. Put the other part of your clip buckle on it. Fold the end of this ribbon 3 or 4 times and sew it together. Otherwise your clip buckle will slip and will get lost.

Case 2

your pillow will look like this, when you attach it to a car seat or a bus seat 🙂

It isnt very hygienic to run with your pillow outdoors:Plus Sonja chose a very large pillow. Not so perfect when you will take it on your journey.

Birgid, the dressmaker of my sewing course made the proposal to sew a bag for this pillow. Not for the whole lenghts of the pillow but half of it. So I made the bag big enough to fold the pillow.

AND SHE WAS RIGHT!!!

Here comes the bag for your pillow:

Case9

Cut the fabric:  2/3 the length of your pillow and add on each side of the bag 4 inch more then the width of your pillow.

Bag 1

Bag 2

Bag 3

Bag 4

Put the cord stops on your cord.

Fold your pillow and take it into your bag 🙂

Case 5

If I would do it again I would take a much larger ribbon below. This bag cant be attach directly to your suitcase because the ribbon is to short.

I also would chose a stronger ribbon for the bag and bigger clip buckles.

This is how it looks like.

But it will work this way too 🙂

Case 6

Merry Christmas and a Happy New Year

XMAS

I didnt blog for some times because I have been sick for weeks.

No energy to work on my shelf, even missed some sewing lessons.

Now I have a few days off. I will using this time to go on with my shelf 🙂

Merry Christmas and a Happy New Year to everyone 🙂 🙂 🙂

Elly